This is featured post 1 title

Lorem ipsum dolor sit amet, consectetur adipisicing elit, sed do eiusmod tempor incididunt ut labore et dolore magna aliqua. Ut enim ad minim veniam, quis nostrud exercitation test link ullamco laboris nisi ut aliquip ex ea commodo consequat.

This is featured post 2 title

Lorem ipsum dolor sit amet, consectetur adipisicing elit, sed do eiusmod tempor incididunt ut labore et dolore magna aliqua. Ut enim ad minim veniam, quis nostrud exercitation test link ullamco laboris nisi ut aliquip ex ea commodo consequat.

This is featured post 3 title

Lorem ipsum dolor sit amet, consectetur adipisicing elit, sed do eiusmod tempor incididunt ut labore et dolore magna aliqua. Ut enim ad minim veniam, quis nostrud exercitation test link ullamco laboris nisi ut aliquip ex ea commodo consequat.

This is featured post 4 title

Lorem ipsum dolor sit amet, consectetur adipisicing elit, sed do eiusmod tempor incididunt ut labore et dolore magna aliqua. Ut enim ad minim veniam, quis nostrud exercitation test link ullamco laboris nisi ut aliquip ex ea commodo consequat.

This is featured post 5 title

Lorem ipsum dolor sit amet, consectetur adipisicing elit, sed do eiusmod tempor incididunt ut labore et dolore magna aliqua. Ut enim ad minim veniam, quis nostrud exercitation test link ullamco laboris nisi ut aliquip ex ea commodo consequat.

Tampilkan postingan dengan label instalasi sofware. Tampilkan semua postingan

Installing Fedora 10

0 komentar

You will need the Fedora 10 DVD image that corresponds to your hardware architecture (i386 or amd64), and which can be downloaded from here. When the download is over, burn the ISO image with your favorite CD/DVD burning application (Brasero on Linux or Nero, CDBurnerXP, Roxio on Windows) on a blank DVD at 4x speed.
· We, here at the Softpedia Labs, always recommend having an empty hard drive for a Linux installation (that means no other operating system on it, no Windows), and you must have a minimum of 10 GB free space for the Fedora installation.

Great, now let's begin. Insert or leave the DVD in your CD/DVD-ROM device, and reboot the computer in order to boot from the DVD. Hit the F8 or F12 key (depending on your BIOS) to select the CD/DVD-ROM as the boot device.

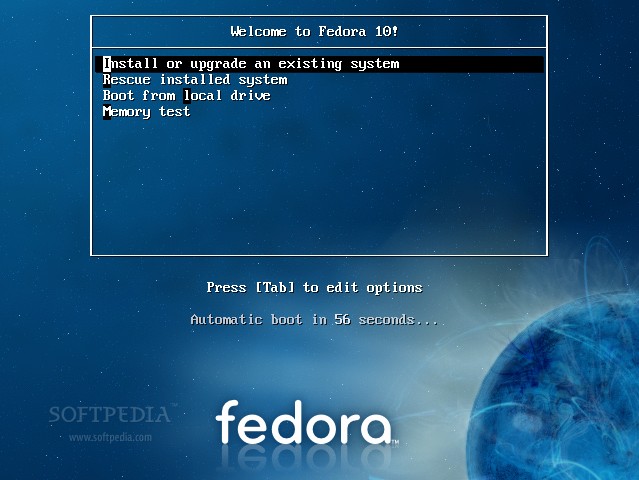
You'll be presented with a very nice Fedora artwork GRUB splash and some options...

Review image


At this stage, we simply suggest you press Enter, and wait for the system to load...

Review image


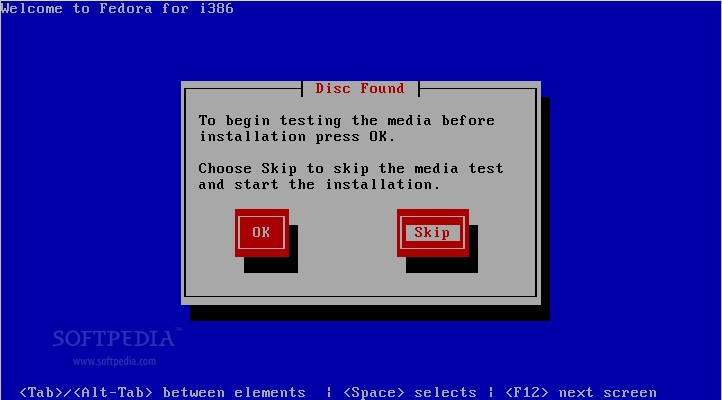
Select the "Skip" option when you're asked if you want to check the media before installation, and press "Enter"...

Review image


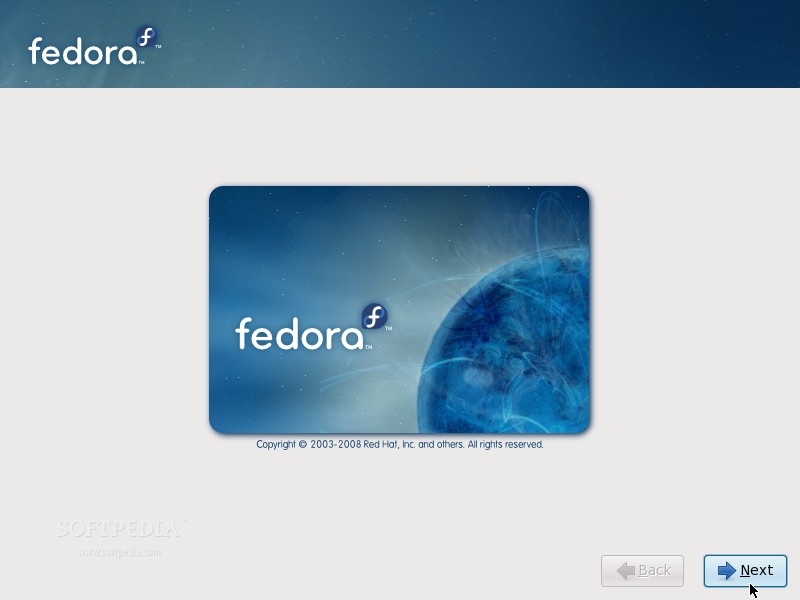
Anaconda (the Fedora installer) will load and you'll see the welcome screen. Click "Next"...

Review image


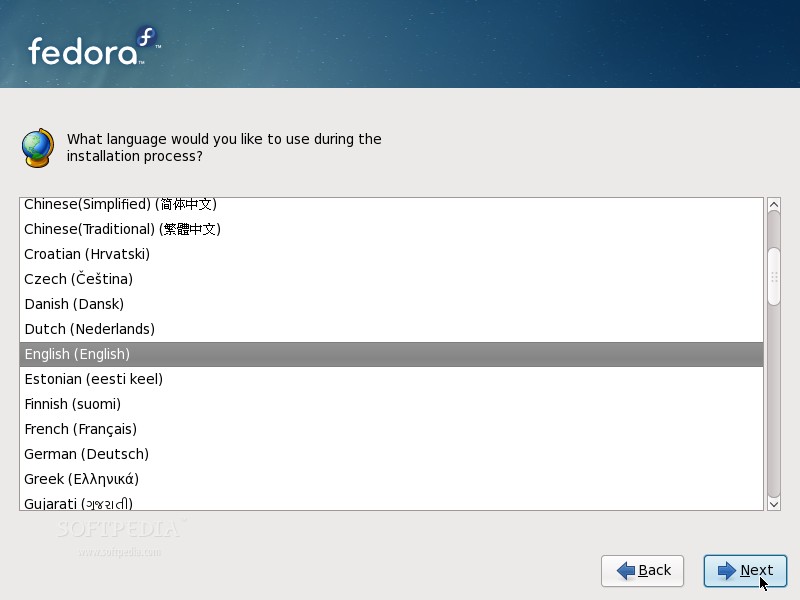
Choose your language...

Review image


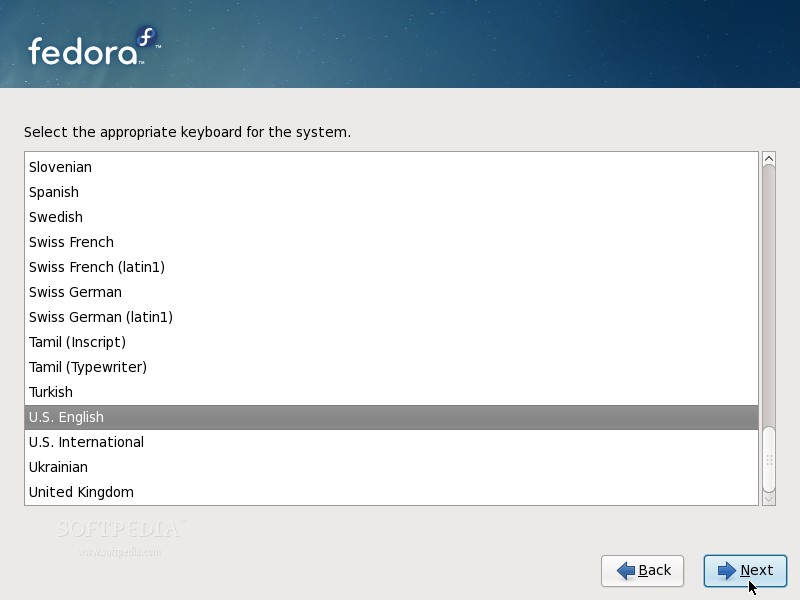
Choose your keyboard layout...

Review image


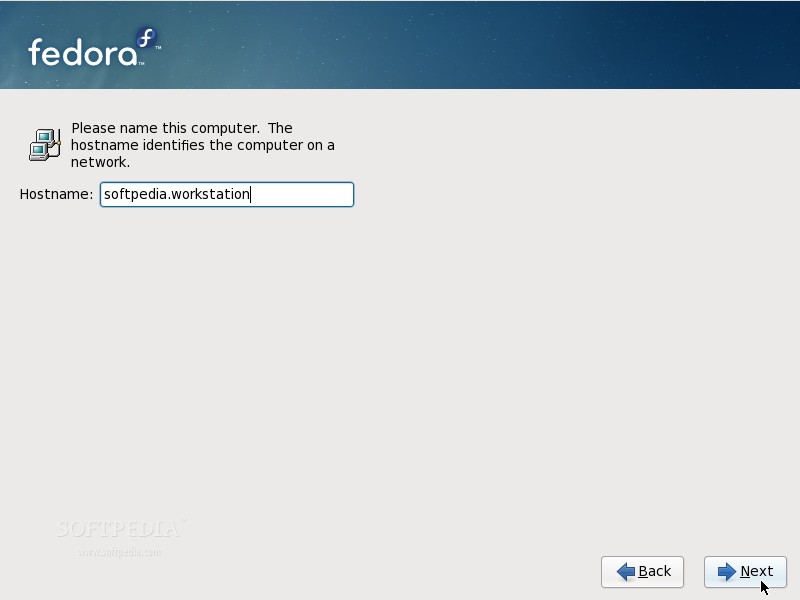
Type a name for the computer. It can be anything you want...

Review image


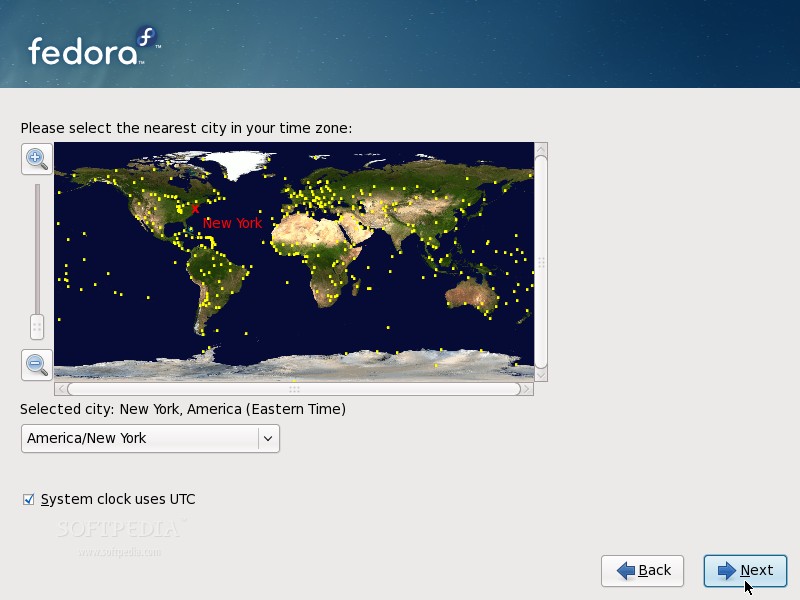
Select your location (country/city)...

Review image


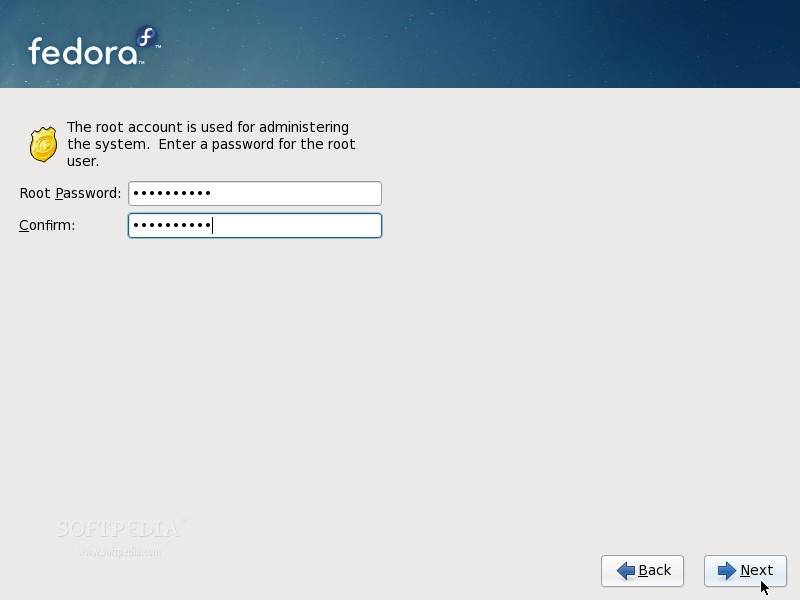
Enter the root (System Administrator) password. The longer, the better (WRITE IT SOMEWHERE)...

Review image


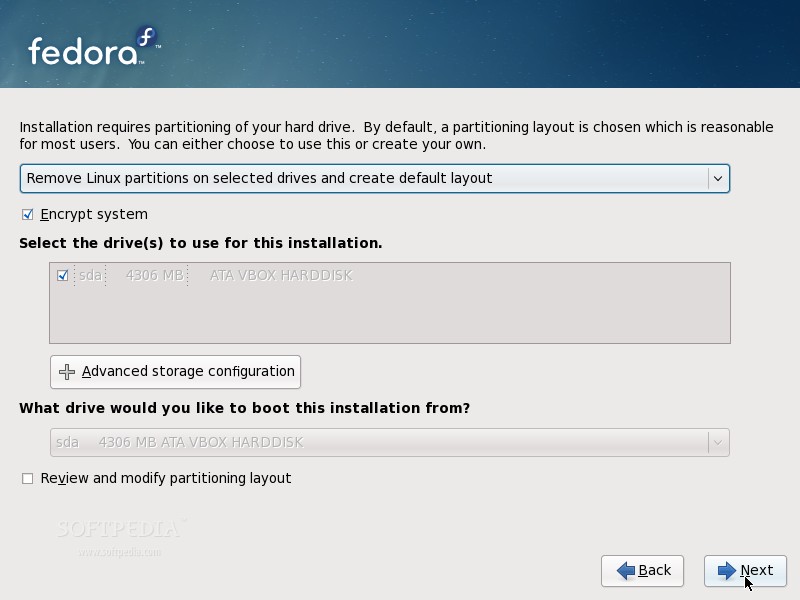
Here comes the partitioning part! If you have an empty hard drive, all you have to do is click "Next," but make sure the "Remove all partitions on selected drives and create default layout" option is selected. If you don't have an empty hard drive and you still want to install Fedora 10 on your machine, then make sure you select the "Use free space on the selected drives and create default layout" option (10 GB minimum of free space is required). Click "Next"...

Review image


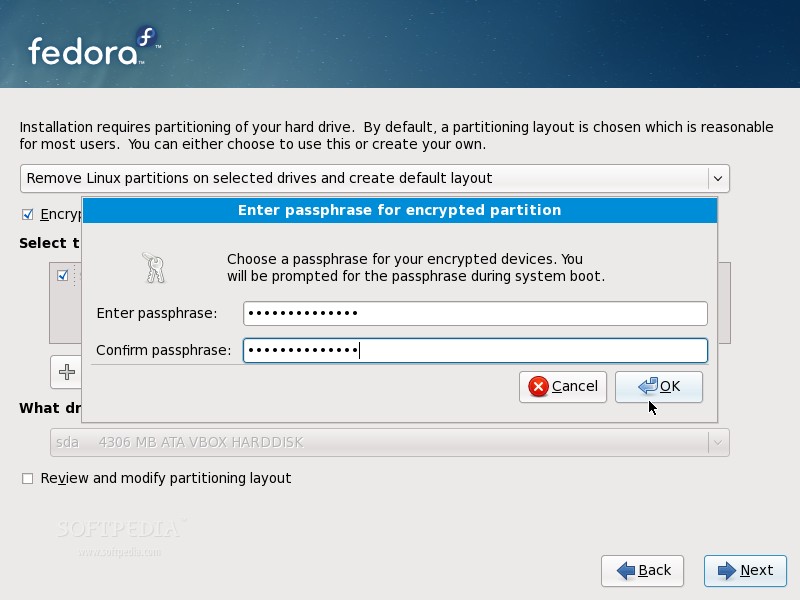
We also recommend to select the "Encrypt system" option. Enter a password (the longer, the better) for the encrypted partition...

Review image


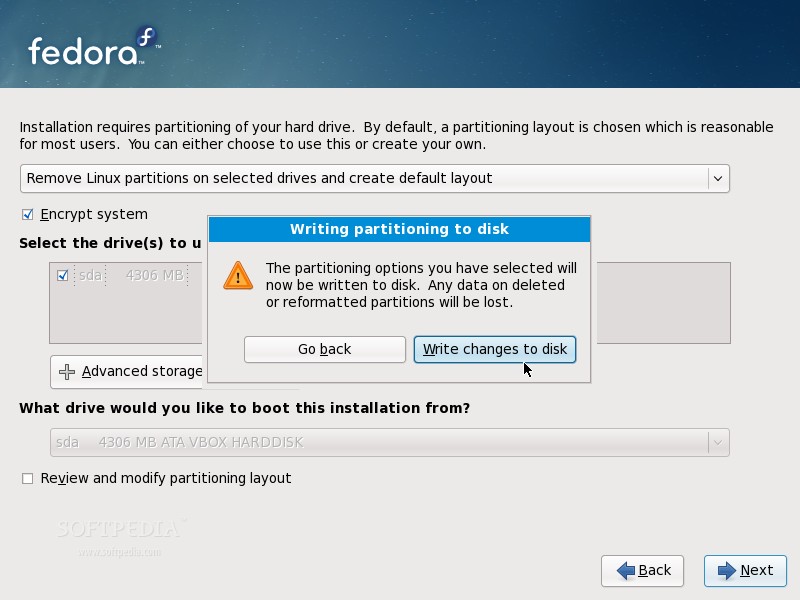
Click the "Write changes to disk" button when asked...

Review image


The hard drive will be formatted and the partitions will be created...

Review image


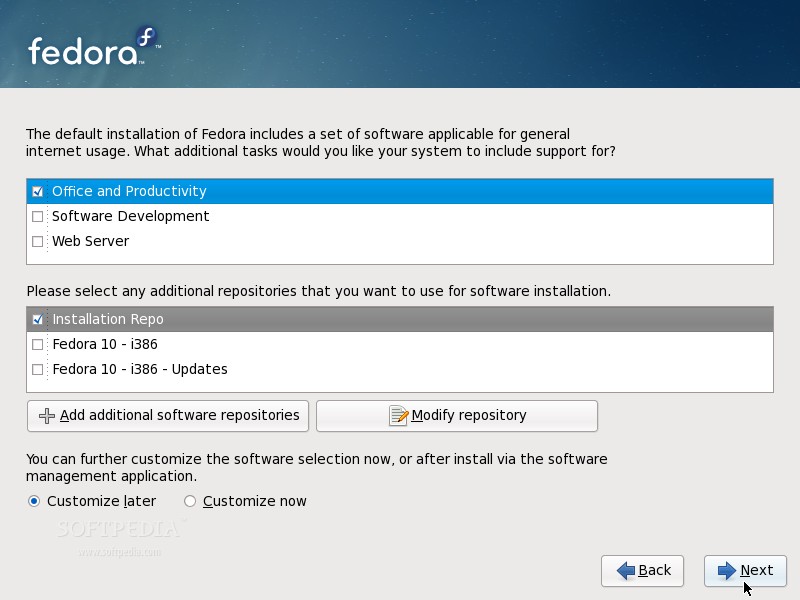
Now, you can select the desired packages...

Review image


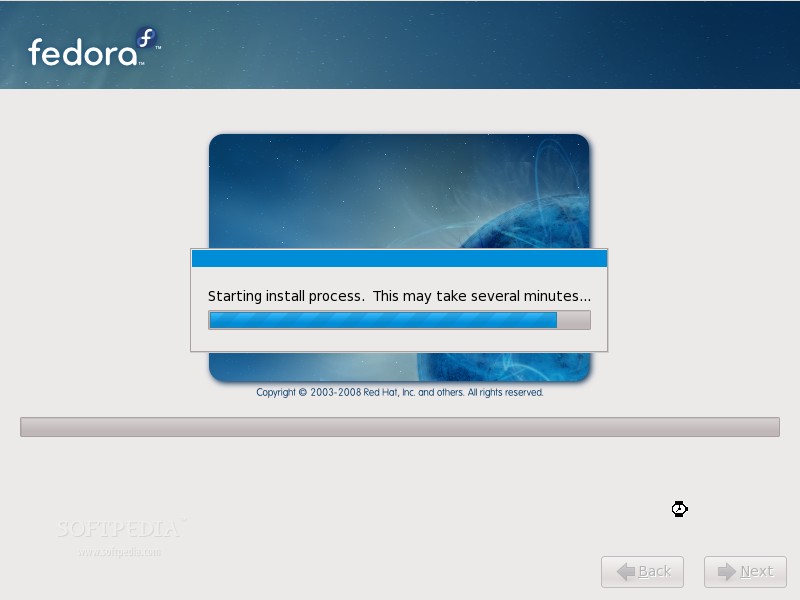
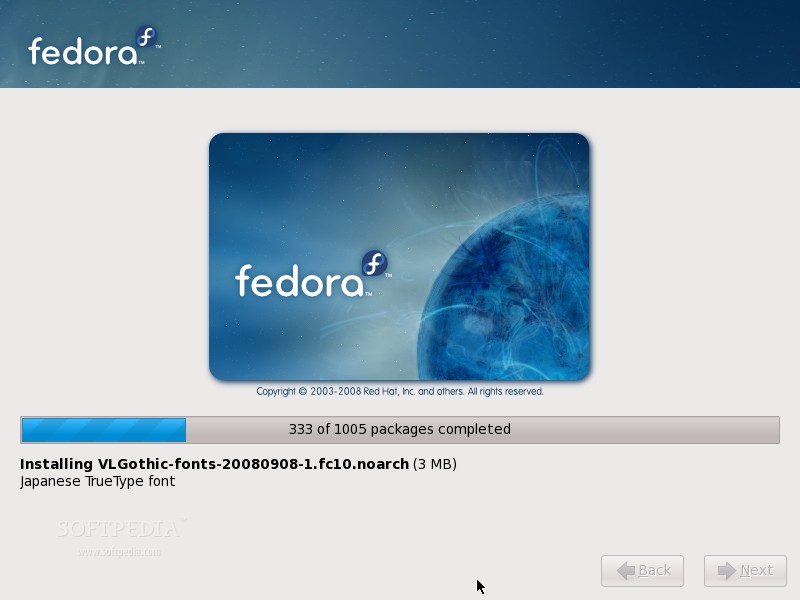
Hit the "Next" button and everything will be done automatically from now on, just sit back and watch how the packages are copied to your hard drive, or you can read the latest news while enjoying a cup of coffee. The installation process will take about 8-10 minutes (depending on your computer specs and the selected packages).

Review image


Review image


Review image


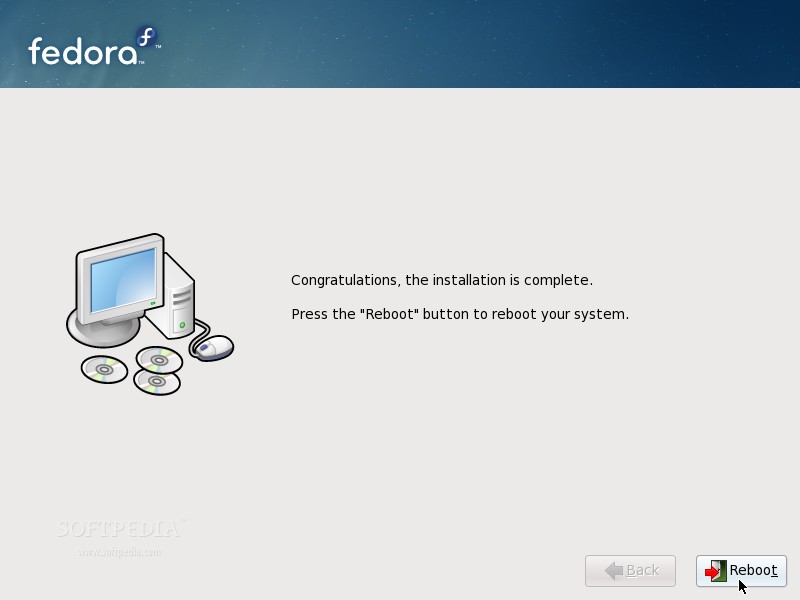
When the installation is over, you will get a "Congratulations, the installation is complete" screen. Click the "Reboot" button and your computer will automatically restart...

Review image


Remove the DVD from your optical drive. Your brand new Fedora 10 operating system will boot for the first time...

Review image


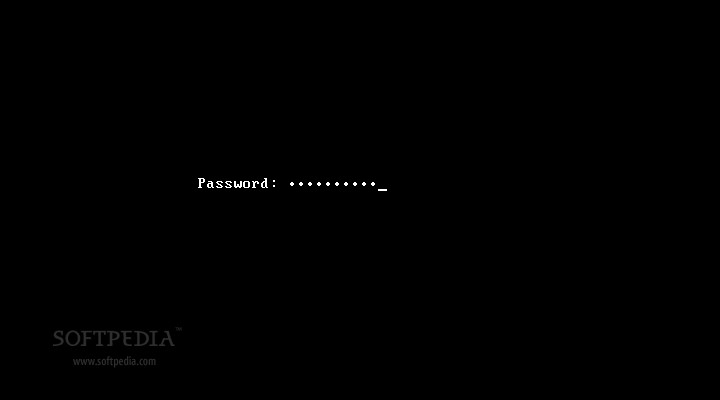
If you've chosen to encrypt your partition, then you'll be prompted for the passphrase...

Review image


The system will continue to boot and in a few seconds you will see the First Boot Configuration Wizard. Click "Forward" on the Welcome screen...

Review image


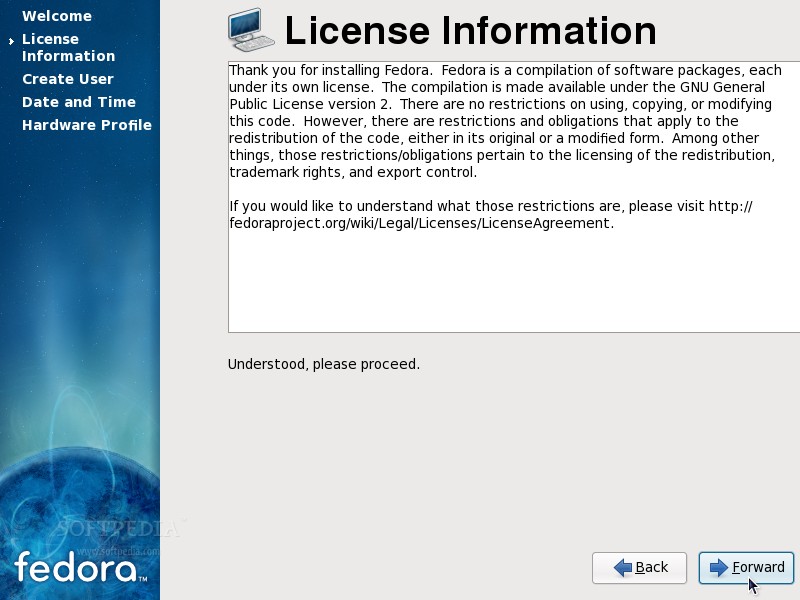
Click "Forward" on the License screen...

Review image


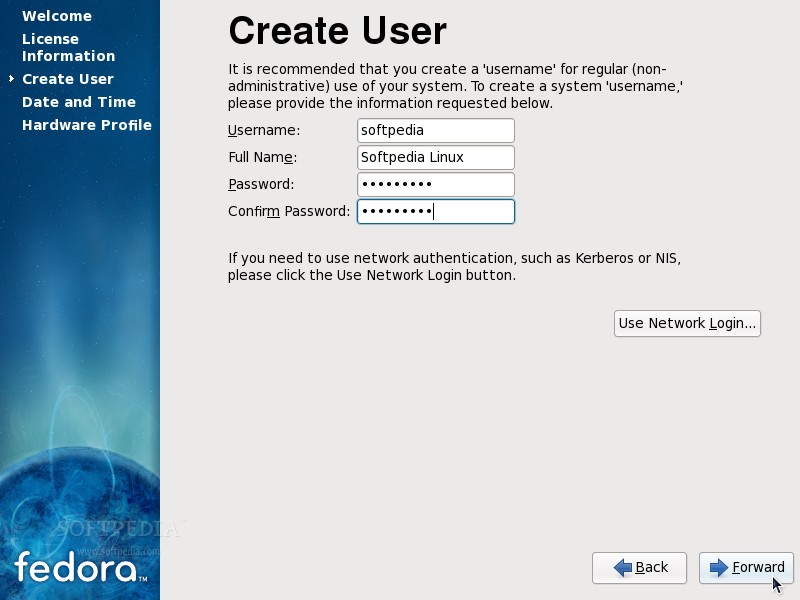
Create a regular user for the system...

Review image


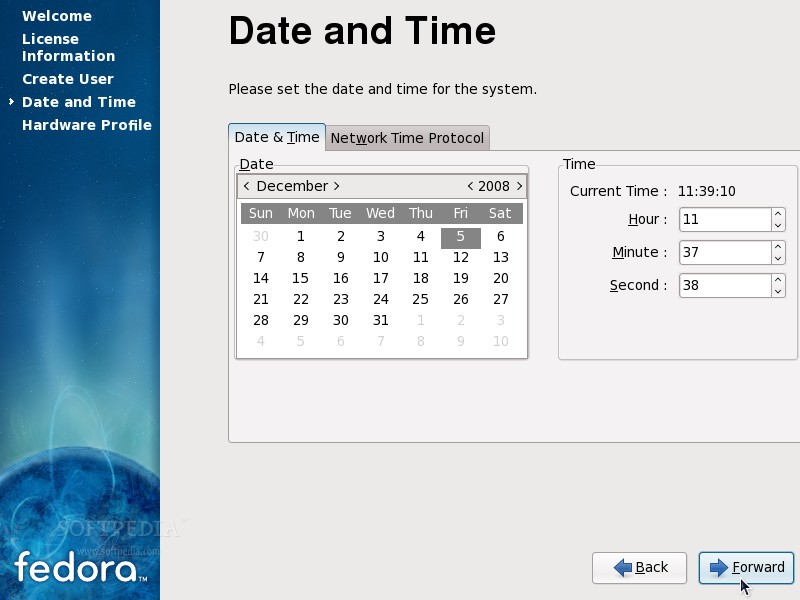
Set the date and time...

Review image


Send your hardware profile to the Fedora Project (optional)...

Review image


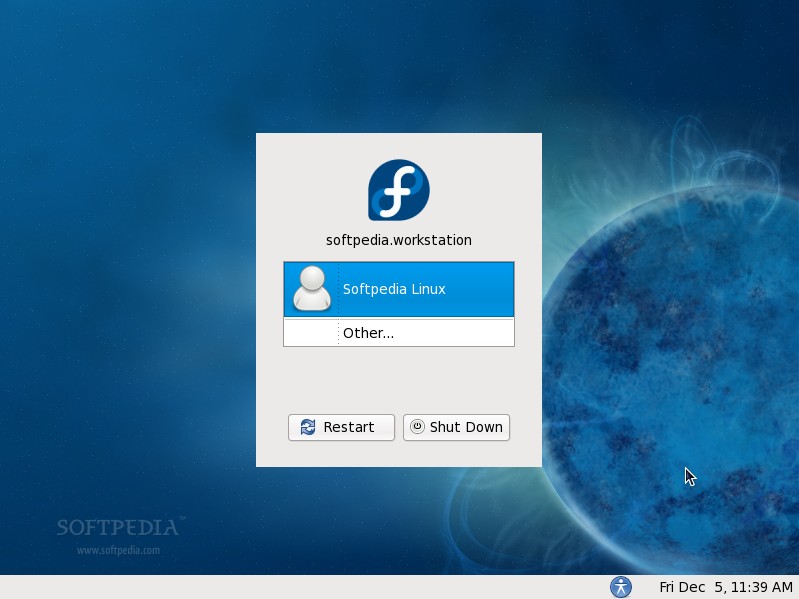
Click "Finish" and you will see the login screen. Enter the password for the regular user you've just created...

Review image


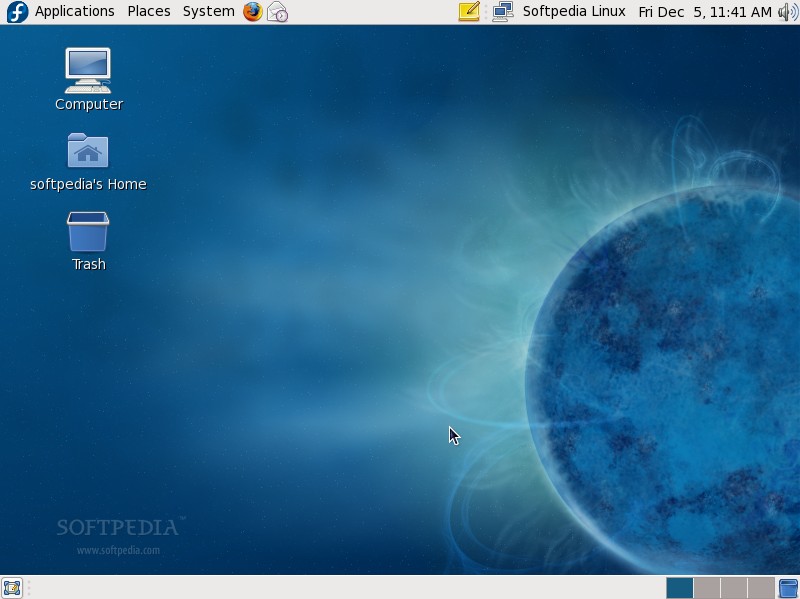
That's it! Enjoy the ultimate and breathtaking Fedora 10 Linux distribution!

Review image

Cara Install Web Server Xampp Terbaru

0 komentar


XAMPP merupakan tool yang menyediakan paket perangkat lunak ke dalam satu buah paket. Dengan menginstall XAMPP maka tidak perlu lagi melakukan instalasi dan konfigurasi web server Apache, PHP dan MySQL secara manual. XAMPP akan menginstalasi dan mengkonfigurasikannya secara otomatis untuk anda atau auto konfigurasi. Versi XAMPP yang ada saat ini adalah Versi 1.4.14 atau yang terbarunya anda bisa download pada http://www.apachefriends.org/en/xampp-window.html
Pertama download software Xampp, klik disini untuk download
Jika sudah selesai terus double klik file Xampp, biasanya tertulis Xampp Win32 1.7.3(Win32 untuk windows dan 1.7.3 adalah versinya). Lihat gambar dibawah.
Jika sudah didouble kilk maka akan tampil seperti gambar dibawah ini
Lalu klik Install
Kemudian akan muncul proses seperti gambar berikut ini
Kemudian akan muncul jendela seperti gambar berikut
Tekan enter sampai anda menemui seperti gambar dibawah ini
Lihat gambar diatas, tekan huruf “x”
Kemudian enter, maka proses instalasi selesai
Untuk memanggil program silahkan klik Start-All Program-Xampp for Windows-Xampp Control Panel
Kemudian akan tampil seperti gambar dibawah ini
Kemudian klik Start pada Apache dan MySql
Jika Apache dan Mysql sudah Running maka Web server local siap dijalankan
Untuk menjalankan ketik “localhost”(tanpa tanda petik) di browser anda
Pilih bahasa dan kemudian selesai

cara menginstal ubuntu

0 komentar

1.  Masukkan CD Instalasi Linux Ubuntu Server, tunggu beberapa saat hingga muncul tampilan awal instalasi. Lalu pilih bahasa yang dikehendaki untuk proses instalasi Ubuntu Server.
1
2.  Pilih “Install Ubuntu Server” untuk melanjutkan proses instalasi Ubuntu Server.
1
3.  Pilih salah satu bahasa sebagai default language system Ubuntu Server.
1
4.  Pilih lokasi negara Anda, jika tidak ada pilihan negara Anda silahkan pilih 'other' lalu tekan ‘enter’ untuk melanjutkan proses instalasi Ubuntu Server.
1
5.  Pilih bagian benua di mana negara Anda berada lalu tekan ‘enter’ untuk melanjutkan proses instalasi ubuntu server.
1
6.  Pilih salah satu negara di mana Anda berada lalu tekan ‘enter’ untuk melanjutkan proses instalasi Ubuntu Server.
1
7.  Pilihan untuk mendeteksi keyboard yang terpasang, Anda bisa melewatinya jika tidak ingin melakukan proses deteksi.
1
8.  Pilih pengaturan keyboard (di sini dicontohkan ‘USA’) lalu tekan ‘enter’ untuk melanjutkan proses instalasi Ubuntu Server.
1
1
9.  Masukkan nama “hostname” yang dikehendaki (jika jaringan milik Anda sendiri), kemudian pilih ‘continue’ untuk melanjutkan proses instalasi Ubuntu Server.
1
10.  Sistem akan mendeteksi zona waktu wilayah Anda. Pilih "Yes" untuk melanjutkan proses instalasi ubuntu Server atau pilih "no" untuk pengaturan zona waktu wilayah Anda
1
11.  Pilihan untuk memandu proses partisi. Di sini dicontohkan dengan memilih pilihan pertama yaitu "Guided - use entire disk"  yaitu memilih semua kapasitas harddisk
1
12.  Konfirmasi untuk memformat, menghapus dan memakai semua kapasitas harddisk.
1
1
13.  Ketikkan nama lengkap dari user Ubuntu Server lalu pilih ‘continue’ untuk melanjutkan proses instalasi Ubuntu Server.
1
14.  Ketikkan username akun Ubuntu Server Anda untuk login ke Ubuntu Server nanti, lalu pilih ‘continue’ untuk melanjutkan proses instalasi Ubuntu Server.
1
15.  Ketikkan password dari akun Ubuntu Server Anda (dianjurkan untuk mengkombinasikan password Anda) untuk login ke Ubuntu Server nanti. Lalu pilih ‘continue’ untuk melanjutkan proses instalasi Ubuntu Server.
1
16.  Verifikasi password akun Ubuntu Server Anda. Lalu pilih ‘continue’ untuk melanjutkan proses instalasi Ubuntu Server.
1
17.  Jika Anda ingin sistem mengenkripsi data pada direktori home saat Anda login silahkan pilih ‘Yes’ atau jika tidak silahkan pilih ‘No’ untuk melanjutkan proses instalasi Ubuntu Server.
1
18.  Jika Anda memerlukan alamat ‘proxy’ untuk mengakses internet silahkan Anda masukkan alamat ‘proxy’ tersebut tetapi Anda bisa mengosongkannya jika Anda tidak memerlukan ‘proxy’, lalu pilih ‘continue’ untuk melanjutkan proses instalasi Ubuntu Server.
1
19.  Sistem sedang melanjutkan proses pengaturan APT (Advanced Packaging Tool).
1
20.  Pilih “No automatic updates” jika Anda tidak akan memperbaharui sistem Ubuntu Server Anda lalu tekan ‘enter’ untuk melanjutkan proses instalasi Ubuntu Server.
1
21.  Pilih software yang akan dipasang pada sistem Ubuntu Server Anda lalu tekan ‘enter’ untuk melanjutkan proses instalasi Ubuntu Server (bisa diinstall kemudian hari, kosongkan saja).
1
22.  Pilih ‘Yes’ untuk melanjutkan proses pemasangan ‘GRUB boot loader’ ke ‘master boot record’. GRUB berfungsi untuk memperbolehkan ‘user’ memilih sistem operasi mana yang akan dijalankan (jika terdapat lebih dari satu sistem operasi).
1
23.  Instalasi Ubuntu Server telah selesai dan sistem akan dinyalakan ulang. Silahkan Anda pilih ‘continue’.
1
24.  Sistem Ubuntu Server Anda telah siap digunakan.
1
25.  Silahkan masukkan ‘username’ dan ‘password’ sesuai dengan yang telah Anda isikan pada saat proses instalasi Ubuntu Server tadi.
1

Populer Post


pC dotCom © 2011 Design by Best Blogger Templates | Sponsored by HD Wallpapers